Last month, we talked about time-tracking setup, single-activity data entry, and user permissions. This month, we’re exploring additional time-and-billing steps.
By now, you’ve set up QuickBooks Online for time tracking and entered your first timed activity. If you have employees who only need to get on the site to complete their timesheets, we showed you how to give them restricted access.
Let’s start here by looking at what’s involved in completing timesheets. We’ll assume for this example that you are entering your own billable time. You can see how this screen looks by clicking the plus sign (+) at the top of the screen, then Employees | Weekly Timesheet. The screen looks very similar to a paper timecard.
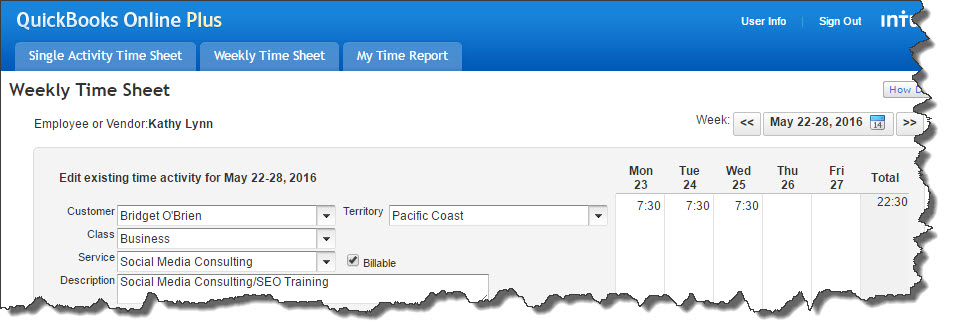
If you had entered a single activity for a billable time block already, all of that information would appear in your timesheet for that week, once you selected your name from the drop-down list in the upper left and set the work week to the correct one in the field to the right. It would look something like this:

Time entries recorded as single activities automatically transfer over to that week’s timesheet.
If you’re going to enter your complete work week directly on the timesheet, you’d open a blank form (using the instructions above) and select your name and the time range. Next, you’d go down to the first field under DETAILS and select the appropriate Customer Name by clicking on the arrows to the right of the field to open the list. Next to that, do the same thing to choose the Service.
The fields below those two are earmarked for Class (if you assign classes) and Territory (or whatever Location Label you’ve chosen). If you haven’t used these and want to explore them, let’s schedule a session to go over QuickBooks Online Classes and Custom Fields.
Type a Description in the box below and click in the box in front of Billable. The hourly rate and tax status should fill in automatically. In the boxes below the correct dates (in the grid to the right), you’d enter the billable hours worked for that customer that week. If you are reporting billable time for more than one customer, or time that is not billable, you’ll of course have to place those entries on new lines.
Employee Timesheets
This is part of what employees see when they log into QuickBooks Online using their Time Tracking only status.
Your employees can, of course, enter hours directly on their own timesheet screens. As we discussed last month, you can choose whether to let employees see the customer’s billing rate. In this example, the employee can only enter hours worked and indicate that they were billable. When you go to approve the timesheet, you will see the rate.
Getting Paid
As you start to create an invoice for a customer who needs to pay for services that have been included in a timesheet, look at the vertical pane to the right of the main working screen titled Add to invoice. Any estimate that hasn’t yet been accepted and any time that hasn’t been paid for should appear in the small blocks in that pane.
You have two options here: Add or Open. Clicking on the first adds that time block to the invoice, and clicking on the second opens the original form. You can also click on the Add all button at the top of the pane to include the details of every entry in the invoice.

When you create an invoice for a customer who has outstanding billable time, that information will appear in the right vertical pane. You can open the original transaction or click to add it to the invoice.
Time Reports
As you can see, time billing can get a little complicated when you have employees entering their own timesheets. And QuickBooks Online wants to make sure that you’ve billed customers for every minute that you’ve worked for them. So there are two reports that you should be consulting regularly. Click on Reports in the left vertical pane, then All Reports and Review Sales. In this list, you’ll see:
- Time Activities by Customer Detail, and
- Unbilled Time.
The titles of these reports should be fairly self-explanatory. Be sure to set the correct date range before running them, though, to avoid missing anything.
Completing timesheets isn’t rocket science. Nor is earmarking time blocks as billable. But due to the setup and the options involved, as well as the complications that can occur when you add employee self-service to the mix, we highly recommend that you meet with us to go over the whole process. We want to make sure that your company’s time entry and timesheet configuration are right from the start.