QuickBooks Online Plus offers the ability to create purchase orders. But they require knowledge that may be foreign to you.
If your business purchases products from vendors that you then sell, you may have occasion to use purchase orders. These forms simply tell your suppliers what items you want to buy from them.
Not all companies that you buy from will require purchase orders. However, if you place an order without one and the wrong items are delivered, you won’t be able to prove that your order was filled incorrectly.
Purchase orders add an additional layer to your bookkeeping – one that can improve accuracy and accountability, but that’s also complex. If you want to take them on, we’d like to introduce you to the concepts you’ll need to learn. You can, though, begin the process on your own to start familiarizing yourself with purchase orders.
Readying QuickBooks Online
QuickBooks Online Plus contains purchase order templates. You’ll fill these out much like you complete an invoice. And like invoices, purchase orders should include as much detail as is possible to ensure accuracy.
Before you can begin, though, you need to make sure that purchase orders are turned on. Click the + sign at the top of the screen and look at the Vendors list. If Purchase Order is there, click on it to open a blank template.
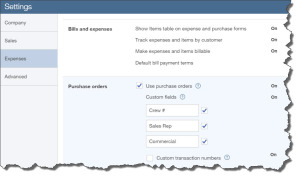
If not, click on the gear icon next to your company name in the upper right corner, then click Settings | Company Settings. Click the Expenses tab on the left. Click in the box to the left of Use purchase orders.

Figure 1: You may have to go to the Company Settings page to turn on purchase orders and define custom fields in QuickBooks Online.
Now the Purchase Order link will appear when you click the + sign at the top of the screen. You’ll also be able to create purchase orders by clicking Vendors in the left navigational pane, and then clicking the drop-down arrow in the ACTION column.
QuickBooks Online lets you define up to three custom fields for these forms. That is, you can add additional fields that will appear on all of your purchase orders. Consider your entries here carefully.
If you want to create your own transaction numbers, click in the box in front of Custom transaction numbers. If you don’t, QuickBooks Online will automatically assign them. When you’ve finished by entering a default message for these forms (optional), click Save.
Creating a Purchase Order
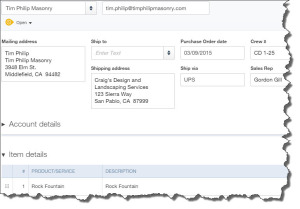
If you’re not already there, click on the + sign at the top of the page and select Vendors | Purchase Order. QuickBooks Online’s Purchase Order form will open without any fields filled in. In the upper left corner of the screen, click on the small up/down arrow to the right of the first field to open your list of vendors. Select the one you want.

Figure 2: QuickBooks Online’s Purchase Order form resembles the invoice form, except you’re ordering rather than selling here.
Directly below that, you’ll see the word Open, with a drop-down arrow next to it. A purchase order is considered Open until you pay for it, at which point the status changes to Closed.
If you want the item(s) shipped directly to a customer, click the up/down arrow to the right of the field under Ship to, and select the right one. If this remains blank, the shipment will be delivered to your business mailing address.
The date should fill in automatically, but you can change it. Enter a courier name in the Ship via box, and fill in any custom fields you’ve created.
That’s the easy part. You’ll notice in the screen shot above that there are two sections below the information you just entered, Account details and Item details. Knowing when to fill in one or the other – or both -- takes some advanced understanding of purchase orders. This is where you’ll need some guidance from us.
Paying for the Goods
When you receive the items you ordered and are ready to pay for them, your purchase order information will be available. If you select the vendor from the screen shot above and want to write a check, for example, this box will appear in the right vertical pane when you select his name.
The purchasing process is second only to payroll in terms of bookkeeping complexity. QuickBooks Online provides the tools you’ll need, and we can help you gain the understanding required.
Social media posts
Has a vendor asked you for a purchase order? QuickBooks Online can create them, but you’ll need our help to understand the process.
Do you regularly transfer money between two accounts? QuickBooks Online now lets you create a rule to manage this process.
There are multiple styles for QBO invoices, sales receipts, and estimates. Click the gear icon in the upper right, then Custom Form Styles.
If you’re only running sales, expense, and purchases reports, you’re missing the big picture. Let us analyze critical financial reports.


