You can now create groups of customers and automate the process of sending payment reminders.
QuickBooks has a new set of tools that can help you deal with what is probably one of your most pressing problems: getting customers to pay. Here’s how to use this new feature.
Creating Your Groups
QuickBooks has added an entry in the Customers menu to take you to these new tools. Go to Customers | Payment Reminders | Manage Customer Groups. In the window that opens, click Create Customer Group. QuickBooks then walks you through a three-step wizard. First, you enter a Name for your group in the first field of the Group details window. We’ll call ours “California High Balance.” If you’d like you can add a Description. Click Next.
In the Select fields window, you’ll set the filters for the group. If you’d rather open your complete list of customers and choose the ones you want manually, you can skip this step. For our example, we’ll define a group by choosing:
- One or more Fields. We want to narrow the group down to California customers. Click the down arrow in the Field box and select State.
- An Operator. Here, you’d select Equals.
- A Value. QuickBooks will display a list of states. Click the box in front of CA. If you’d like to include more states, you can do so. When you’re done, click Add. You’ll see your Selected fields in the box below.
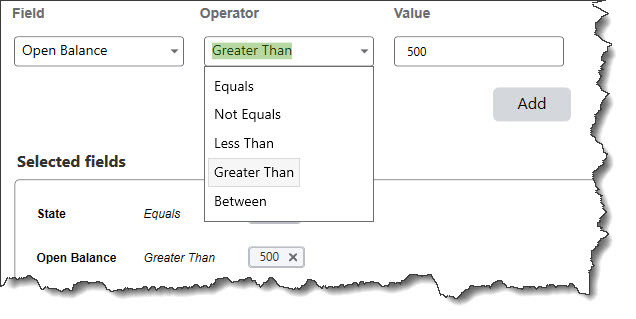
You can set the parameters for your group by selecting multiple fields, operators, and values.
We want to narrow the list down to customers in California who have open balances of more than $500. So you’d select Open Balance for the Field, Greater Than for the Operator, and 500 for the Value. Then click Add again to move your filter into the Selected fields box.
You can keep adding filters to narrow down your list even more if you’d like. When you’re done, click Next. The View/select customers window opens displaying the results of your search in a table whose columns include Name, Overdue balance, and Avg days to pay. There’s a checkmark in the box in front of Automatically add new or remove existing customers based on fields and values selected in this group.
If you leave the box checked, QuickBooks will move customers into the group as their open balances top $500 and out when they catch up on their payments. Uncheck the box, and you’ll have to add and remove customers manually, which would take vigilance and a lot of extra work. If you’re satisfied with the list, click Finish, then OK. The Manage groups window now contains an entry for your new group.
Entries here are earmarked with icons indicating whether they are manually or automatically updated. You can also click links in the Actions column to edit or delete a group or send an email to it. If you select the last option, a window will open containing your list of customers (you can unselect any of them) and a composition box for your email.
Sending Payment Reminders
To start working with Payment Reminders, open the Customers menu and click Payment Reminders | Schedule Payment Reminders. Click Let’s get started. From the next window, you can send either invoices or statements. Click New schedule next to Invoice and enter a name in the box that opens. We’ll call ours 15 days past due since we want to create reminders for customers who are more than 15 days past due.
We want this to go to all customers who fit the criteria, so click <Add New> in the drop down list that follows Send reminder to. Call the new group All customers in the window that opens. Click Next, then Next again to display your entire list of customers. Click Finish, then OK. Back on the Schedule payment reminders screen, click + Add Reminder. This overlapping window will open:

You can see and edit what your reminder will say and what fields will be replaced with real data.
Enter 15 after Send this reminder and select after from the drop-down list. QuickBooks supplies a sample email that you can edit if you’d like. Real data will, of course, replace the text in brackets. You can delete any of these and add more by clicking Insert Field in the lower right corner. Be very careful if you modify the bracketed fields. Brackets should surround the exact text that comes from the QuickBooks options supplied.
When you’re satisfied with your email, you can Check spelling. Then click OK. You’ll be back at the Payment reminders screen where you can save your reminder or add another.
QuickBooks will now prompt you to send reminders when they’re due. You can track them in your customers’ invoice histories and in your sent mail folder. When the time comes, open the Customers menu and select Payment Reminders | Review & Send Payment Reminders. QuickBooks will display a list of reminders that need to be dispatched. Make sure all of the reminders you want to send have a checkmark in the box next to them and click Send Now.
There’s nothing difficult about using these new QuickBooks tools, but you should be very careful with them. You don’t want to annoy customers by sending payment reminders unless they’re really warranted. You also don’t want to let late payments languish. Should you choose to use them, we’d be happy to walk you through the process to prevent errors. As always, we’re available to respond to your questions about QuickBooks and to help you make optimal use of it in your business.